Introduction
LED Light Bars are a super-easy way to add some extra-bright
and colorful illumination to your project. Each Light Bar is
essentially a set of three super-bright 5050-size LEDs. They’re offered
in a variety of colors including white, red, blue, and green (note: the blue and green light bars are an older version, they
look different but can still be connected the same way).

Hardware Overview
A glance at the LED Bars will reveal that there’s not a whole lot
required to interface with them. There are two pairs of wire pigtails
coming off the sides, labeled ‘+’ and ‘-’. The darker-gray wire connects
to the ‘+’ pin, and the white wire connects to ‘-’ on both sides.
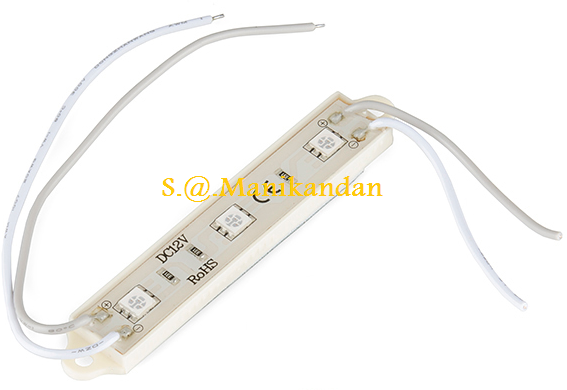
For mounting purposes there are drill holes on either side of the board, and a peel-away sticky foam on the backside.
LED Characteristics
The “nominal” voltage for these LED Bars is 12V. “Nominal” as in that’s what’s recommended by the manufacturer. They will work at lower voltages, although that’ll mean sacrificing some brightness.The table below shows some of the characteristics for each of the LED bar colors. These are values we found while testing the bars out. The minimum voltage was the lowest voltage where the LEDs were at recognizably lit up, although very dim. We recommend that you at least give the LEDs around 7V. The higher the voltage, the brighter your LED will be.

Light Bar Circuit
Looking at the visible components on the bars, it’s apparent that
there’s not a lot to them. Three six-pin, SMD LEDs, and an equal number
of resistors. We can easily reverse-engineer this circuit to find out
exactly how these things work.

Assembly tips
In most cases, Light Bar assembly begins with stripping some wire. The wire pigtails on the bars are 20 AWG, and should be easy enough to strip with any, old wire stripper.The wire lengths can be extended, if need be, with a little splice. Don’t forget to cover your splice with heatshrink!
Alternatively the stripped pigtails can be tinned, crimped, or plugged directly into a mating connector.
Stringing bars
The ‘+’ and ‘-’ wires of one bar can be connected to another to string
them together. More and more bars can be stringed until you start to
approach the current limit of the 20 AWG wires – about 1.5A. With some
back of the napkin calculations – 55mA per bar, 1.5A max – that’d be
25-ish bars.

Mounting the bars
There are two possible methods for mounting the LED bars. There are mounting holes on either end of the bar with a 0.15" drill diameter, allowing for the bars to be screwed down. Every bar also includes a peel-away sticky-foam backing which adheres about as well as you could expect.With a little prying, the PCB assembly part of the LED bar can be removed from the plastic mounting backing. This might be useful if your boards might need a tighter fit.

Example Circuits
There are a variety of ways these LED bars can be controlled and illuminated. Let’s look at a few example circuits:
Direct Power
If you don’t care about dimming the LEDs, the easiest way to power them
up is to connect them directly to a 12V power supply. Stick them in your
enclosure or project, plug the supply in, and forget about them. If
you’re looking for a supply that can source 12V,

The DC Terminal Adapter makes connecting the 12V wall wart to the LED bar way easy.
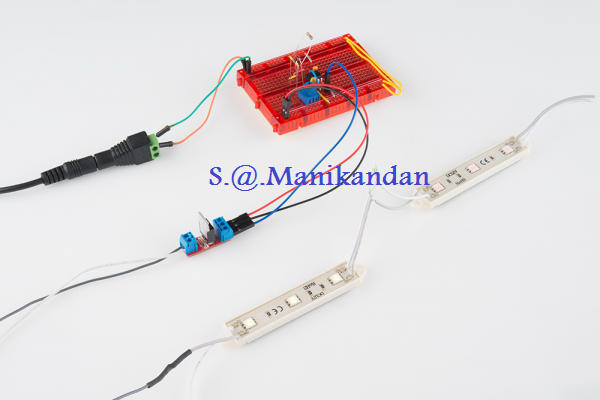
To gain a little control over the LEDs, you can add a switch in-line between the power source and either the ‘+’ or ‘-’ wire of the first LED bar.Dimming with MOSFET Using a 555 Timer
If you want to add some dimming control over your LED bar, MOSFETs combined with pulse width modulation
are the tools you’ll need. There are a few approaches you can take to
generating a PWM signal to control the MOSFET and LED bar. Here are a
couple options:
control the LED bars via PWM. Use a circuit like below, with an n-channel MOSFET use a 555 timer and a handful of common components to generate the PWM signal. Here’s an example circuit:

Most 555 timers can work at up to 16V, so you can run it directly off
the 12V supply. Then twist the potentiometer to adjust the brightness.
LED Light bar applications


Application:
=== > Led module + back light for sign
=== > Back lighting for advertising signs,channel letters,light boxes,etc.
=== > Widely used indoor/outdoor advertising sign, channel letter & signs with non-waterproof requirements
=== > Ideal for small channel letter & lighting box
Specifications:
Led type
|
5050smd
|
Led quantity
|
3pcs
|
Size
|
75*12*4mm
|
Material
|
Plastic
|
Input voltage
|
DC12V
|
Current
|
60mA
|
Power
|
0.72W
|
Color
|
Red/Blue/Green/White/RGB
|
Viewing angle
|
120°
|
Lumen
|
60-66lm
|
Working temperature
|
-20℃--60℃
|
Storing temperature
|
-25℃--80℃
|
Certification
|
CE/Rohs
|
Lighting pictures:


LED Polarity :


smd led strip

Led data sheet
Forwatd Voltage = 2.8 ~ 3.5 DC
Forward Current = 60 mA
Lumens / LED = 18.5 ~ 22.5 Lumens
Beam Angle (Degrees) = 120
Power = 0.2 w
Ledfy is the leding led light manufacturers in delhi .Ledfy providing complete LED lighting solution to its customers. They have a vast range of LED Products.
ReplyDeleteYou have beaten yourself this time, and I appreciate you and hopping for some more informative posts in future. Thank you for sharing great information to us. Best LED grow lights
ReplyDeleteDon’t purchase an LED Light or disco light and don’t waste your money install this app in your android device and solve your disco with music, flashlight & strobe light problem.
ReplyDeleteSTV Motorsports' light bar switches are a game-changer for off-road enthusiasts. The quality and durability of their products speak volumes about their commitment to excellence. I've been using their switches, and they've proven to be both reliable and stylish. It's clear that STV Motorsports understands the needs of the off-road community. Keep up the great work!
ReplyDelete